OmniGraffle by The Omni Group is a fantastic diagramming tool for OS X, and anyone studying graph theory is bound to find it useful for working through the details of graph algorithms. One day I thought to myself, “wouldn’t it be cool if we could implement a graph algorithm in, say, Swift, and run it directly on the OmniGraffle canvas?” With OmniGraffle Pro’s extensive Scripting Dictionary and OS X’s Scripting Bridge framework, we can do just that. In this article, we’ll implement Tarjan’s algorithm for finding the strongly-connected components of a directed graph (in Swift). We’ll then run the algorithm on a graph in the OmniGraffle canvas, coloring any strongly-connected components we find.
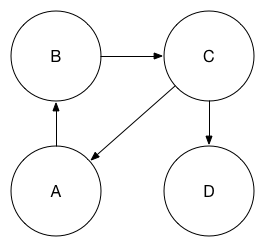
We’ll start by creating a simple directed graph in OmniGraffle. Close any existing documents you may have open in OmniGraffle. Next, head over to the File menu and select New. We’ll start with a clean slate and use the Auto-Resizing template (found under the Imperial Units category). With the Shape tool, add four circles representing four different nodes and label them A-D. Next, add directed edges with the Line tool, as shown below. Note that it’s important to drag connections from the source node to the destination node as this determines the sources and destinations of line objects in OmniGraffle’s scripting interface; merely changing the tail/head arrow type will not cut it.
Rename the first canvas, Canvas 1, to Simple Graph and save the document. A copy of the OmniGraffle document can be downloaded here.
Now switch to Xcode, navigate to File > New > Project and create a new OS X Command Line Tool written in Swift.
To talk to OmniGraffle from Swift, we’ll use the Scripting Bridge framework, which was first introduced in Mac OS X 10.5 “Leopard”. Scripting Bridge allows developers to control AppleScript-enabled applications from languages other than AppleScript, including Python and Objective-C. Since Swift interoperates with Objective-C, we’ll be able to use Scripting Bridge to control OmniGraffle from Swift.
Objective-C developers typically get started using Scripting Bridge by auto-generating Objective-C interfaces that correspond to an application’s Scripting Dictionary. We can generate an Objective-C interface for OmniGraffle’s Scripting Dictionary with the following command:
sdef /Applications/OmniGraffle.app | sdp -fh --basename OmniGraffle
In an Objective-C application, we would then proceed in importing the Scripting Bridge framework and initializing an instance of SBApplication with OmniGraffle’s bundle identifier. We would then cast our SBApplication object to an OmniGraffleApplication (defined in the exported OmniGraffle.h file). Now we would be able to traverse through any open documents, talk to OmniGraffle’s canvas, manipulate shapes, and so on. In doing so, any Objective-C messages we would send to these “proxy” objects would get translated to Apple Events behind the scenes with some Objective-C runtime magic.
Since we don’t have a tool for auto-generating a Swift interface to OmniGraffle’s Scripting Dictionary, we’ll have to write our own. This isn’t as bad as it sounds, since we only need to define the interfaces we’ll actually need. In Xcode, create a new Swift file, OmniGraffleScripting.swift, and paste in the following code:
import Cocoa
import ScriptingBridge

@objc protocol SBObjectProtocol: NSObjectProtocol {}

@objc protocol SBApplicationProtocol: SBObjectProtocol {}

@objc protocol OmniGraffleItem: SBObjectProtocol {}

@objc protocol OmniGraffleGraphic: OmniGraffleItem {
	optional var id: Int { get }
}

@objc protocol OmniGraffleSolid: OmniGraffleGraphic {
	optional func setFillColor(color: NSColor)
}

@objc protocol OmniGraffleShape: OmniGraffleSolid {}

@objc protocol OmniGraffleLine: OmniGraffleGraphic {
	optional var source: OmniGraffleGraphic { get set }
	optional var destination: OmniGraffleGraphic { get set }
}

@objc protocol OmniGraffleCanvas: SBObjectProtocol {
	optional var name: String { get set }
	optional func shapes() -> SBElementArray
	optional func lines() -> SBElementArray
}

@objc protocol OmniGraffleDocument: SBObjectProtocol {
	optional func canvases() -> SBElementArray
}

@objc protocol OmniGraffleApplication: SBObjectProtocol {
	optional func documents() -> SBElementArray
}

extension SBObject: OmniGraffleItem {}
extension SBObject: OmniGraffleGraphic {}
extension SBObject: OmniGraffleSolid {}
extension SBObject: OmniGraffleShape {}
extension SBObject: OmniGraffleLine {}
extension SBObject: OmniGraffleCanvas {}
extension SBObject: OmniGraffleDocument {}
extension SBApplication: OmniGraffleApplication {}
For every class in OmniGraffle.h that we intend to use, we define a Swift protocol and ensure it’s visible to the Objective-C runtime with the @objc keyword. Then we simply translate the relevant properties and methods to Swift. Note that these are marked as optional to prevent the compiler from requiring us to provide an implementation.
Now in our main.swift file, we can talk to the canvas of the OmniGraffle document we created earlier. To make sure things are working properly, we’ll first print out the name of the canvas, which we set to Simple Graph.
import Cocoa
import ScriptingBridge

let app: OmniGraffleApplication = SBApplication(bundleIdentifier: "com.omnigroup.OmniGraffle6.MacAppStore")
let documents = app.documents!()
let firstDoc = documents.firstObject! as! OmniGraffleDocument
let canvas = firstDoc.canvases!().firstObject as! OmniGraffleCanvas
println(canvas.name!)
Note you may have to change your bundle identifier depending on which version of OmniGraffle you are using. We also assume that the desired OmniGraffle document is the first one open. If you run the program, you should see Simple Graph printed in Xcode’s Debug area. That wasn’t too bad, but all the casts and forced unwraps necessary to get Scripting Bridge working in Swift are not particularly elegant. Furthermore, OmniGraffle’s interfaces weren’t designed for running graph algorithms on them.
To make our lives easier, we’ll define a simple graph library in Swift. It’ll consist of two data structures: a Graph class and a Node class. The Graph class will simply keep around a collection of nodes. Our Nodes will include a unique identifier as well as outgoing edges to their collections of neighbors. Since we’re finding strongly-connected components in a directed graph, all of our edges are directed. We’ll also need to look up nodes given their identifiers (ideally in constant time). To facilitate this, Graph objects include a map from identifiers to nodes. While this is not the only way we could have designed these structures, it’s convenient for our problem at hand. If you’re planning on experimenting with different algorithms, I encourage you to come up with a more general, reusable implementation.
class Graph {
	private(set) var nodes = [Node]()
	private var identifiersToNodes = [Int: Node]()

	func addNode(node: Node) {
		identifiersToNodes[node.identifier] = node
		nodes += [node]
	}

	func nodeByIdentifier(identifier: Int) -> Node? {
		return identifiersToNodes[identifier]
	}

	func addEdgeFromNode(source: Node, toNode destination: Node) {
		source.addNeighbor(destination)
	}
}

class Node: Hashable {
	private(set) var identifier: Int
	private(set) var neighbors = [Node]()

	init(identifier: Int) {
		self.identifier = identifier
	}

	private func addNeighbor(node: Node) {
		neighbors += [node]
	}

	var hashValue: Int {
		return identifier
	}
}

func ==(lhs: Node, rhs: Node) -> Bool {
	return lhs.identifier == rhs.identifier
}
Now that we have our graph library, we need to reduce the graph we designed in our OmniGraffle canvas to the aforementioned structures. We’ll start by creating another file, GraphOmniGraffle.swift.
We’ll define a new function, buildGraphForCanvas, that will create a new Graph with nodes for all the circles and edges for all the lines in our OmniGraffle document’s canvas. For the sake of simplicity, I will assume that all shapes in the canvas are nodes and all lines in the canvas are edges. For more complex diagrams, you should validate the type of the shape.
func buildGraphForCanvas(canvas: OmniGraffleCanvas) -> Graph {
	let graph = Graph()

	for shape_ in canvas.shapes!() {
		var shape = shape_ as! OmniGraffleShape
		graph.addNode(Node(identifier: shape.id!))
	}

	for line_ in canvas.lines!() {
		let line = line_ as! OmniGraffleLine

		let sourceIdentifier = (line.source! as! OmniGraffleShape).id!
		let destinationIdentifier = (line.destination! as! OmniGraffleShape).id!

		let sourceNode = graph.nodeByIdentifier(sourceIdentifier)!
		let destinationNode = graph.nodeByIdentifier(destinationIdentifier)!

		graph.addEdgeFromNode(sourceNode, toNode: destinationNode)
	}

	return graph
}
Now we have a graph representation that is more suitable for running Tarjan’s algorithm. Once we find the strongly-connected components of a graph, we’ll need to communicate back with OmniGraffle to visualize them. The mapIDsToShapes helper function will map node identifiers back to shapes in the canvas, so we’ll be able to quickly look them up and modify their visual appearance.
func mapIDsToShapes(canvas: OmniGraffleCanvas) -> [Int: OmniGraffleShape] {
	var map = [Int: OmniGraffleShape]()

	for shape in canvas.shapes!() {
		map[shape.id!] = shape as? OmniGraffleShape
	}

	return map
}
We now have all the pieces we need to run and visualize the output of Tarjan’s algorithm right in our OmniGraffle document’s canvas. We’ll now implement Tarjan’s algorithm in a new source file, GraphTarjan.swift. The details of the algorithm are beyond the scope of this article, and you can read more about them here. In short, we’ll find the sinks of the graph (the sources of the reverse of the graph), and then explore all reachable nodes. It turns out that the reachable nodes make up a strongly-connected component of the graph. Next, we “remove” the strongly-connected component we just found by marking all of its nodes as visited, and we repeat the process. We implement Tarjan’s algorithm in an extension of our Graph class:
extension Graph {
	var reversedGraph: Graph {
		let newGraph = Graph()

		// Copy nodes.
		for node in nodes {
			newGraph.addNode(Node(identifier: node.identifier))
		}

		// Reverse edges.
		for node in nodes {
			let sourceNode = newGraph.nodeByIdentifier(node.identifier)!

			for destinationNodeOld in node.neighbors {
				let destinationNode = newGraph.nodeByIdentifier(destinationNodeOld.identifier)!

				newGraph.addEdgeFromNode(destinationNode, toNode: sourceNode)
			}
		}

		return newGraph
	}

	func findDecreasingPostOrder(graph: Graph) -> [Node] {
		var postOrdering = [Node]()
		var nodesToVisited = [Node: Bool]()

		for node in graph.nodes {
			nodesToVisited[node] = false
		}

		let startNode = graph.nodes.first!
		findOrdering(startNode, nodesToVisited: &nodesToVisited, postOrdering: &postOrdering)

		return postOrdering
	}

	private func findOrdering(node: Node, inout nodesToVisited: [Node: Bool], inout postOrdering: [Node]) {
		nodesToVisited[node] = true

		for neighbor in node.neighbors {
			if !nodesToVisited[neighbor]! {
				findOrdering(neighbor, nodesToVisited: &nodesToVisited, postOrdering: &postOrdering)
			}
		}

		postOrdering.append(node)
	}

	func findAllReachableNodesFromNode(node: Node, inout nodesToVisited: [Node: Bool]) -> [Node] {
		nodesToVisited[node] = true

		var allNodes = [node]

		for neighbor in node.neighbors {
			if !nodesToVisited[neighbor]! {
				allNodes += findAllReachableNodesFromNode(neighbor, nodesToVisited: &nodesToVisited)
			}
		}

		return allNodes
	}

	func findSCCs() -> [[Node]] {
		let postOrdering = findDecreasingPostOrder(reversedGraph)
		var nodesToVisited = [Node: Bool]()
		var SCCs = [[Node]]()

		for node in postOrdering {
			nodesToVisited[node] = false
		}

		for node in postOrdering {
			if !nodesToVisited[node]! {
				SCCs += [findAllReachableNodesFromNode(node, nodesToVisited: &nodesToVisited)]
			}
		}

		return SCCs
	}
}
Back in main.swift, after the line that prints the name of the canvas, we’ll build a Graph from our OmniGraffle document’s canvas and invoke Tarjan’s algorithm on it.
let graph = buildGraphForCanvas(canvas)
let IDsToShapes = mapIDsToShapes(canvas)
let SCCs = graph.findSCCs()
Now the SCCs array contains all of the strongly-connected components of the graph, each one being a collection of nodes.
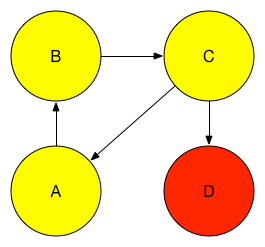
The only thing we have left to do is color each strongly-connected component. This is pretty straightforward, and the code is shown below. Note that if you run this on a graph with more than four strongly-connected components, you’ll need to provide more colors. Alternatively, you can generate colors randomly.
let colors = [NSColor.yellowColor(), NSColor.redColor(), NSColor.orangeColor(), NSColor.blueColor()]
var colorIndex = 0

for SCC in SCCs {
	let color = colors[colorIndex++]

	for node in SCC {
		IDsToShapes[node.identifier]!.setFillColor(color)
	}
}
If we now run our program and switch to OmniGraffle, we’ll see our original graph with its strongly-connected components colored.
I encourage you to implement other graph algorithms and see what you can come up with. Have fun!